MPLS-VPN 検証構成とコンフィグ設定 その8(PE-CE間でBGPを使用)の続きとなります。
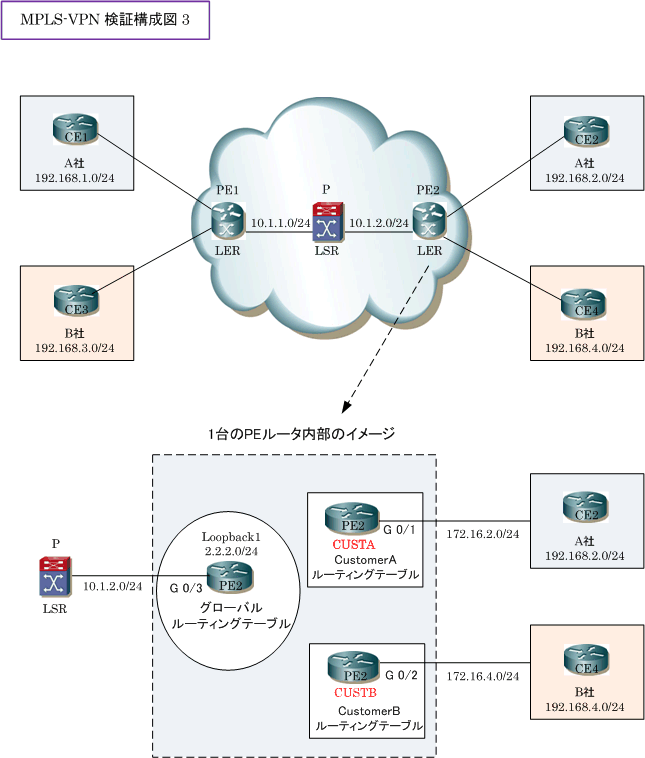
前回の記事で次のMPLS-VPN 検証構成の「CE1、CE2、CE3、CE4、PE1、P」ルータの設定が完了しました。今回の記事で「PE2」ルータの設定をして完了となります。
MPLS-VPN Step3:PEルータのコンフィグ設定

◆ CustomerA用のVRFとルーティングの設定
ip vrf CUSTA
rd 1:100
route-target import 10:100
route-target export 10:100
interface GigabitEthernet0/1
ip vrf forwarding CUSTA
ip address 172.16.2.254 255.255.255.0
◆ CustomerB用のVRFとルーティングの設定
ip vrf CUSTB
rd 2:200
route-target import 20:200
route-target export 20:200
interface GigabitEthernet0/2
ip vrf forwarding CUSTB
ip address 172.16.4.254 255.255.255.0
◆ グローバルルーティング用のIGP、LDP、MP-BGPの設定
ip cef
interface loopback1
ip address 2.2.2.2 255.255.255.0
ip ospf network point-to-point
interface GigabitEthernet0/3
ip address 10.1.2.1 255.255.255.0
mpls ip
router bgp 65000
no bgp default ipv4-unicast
neighbor 1.1.1.1 remote-as 65000
neighbor 1.1.1.1 update-source Loopback1
address-family vpnv4
neighbor 1.1.1.1 activate
neighbor 1.1.1.1 send-community both
address-family ipv4 vrf CUSTA
neighbor 172.16.2.1 remote-as 65501
neighbor 172.16.2.1 as-override
address-family ipv4 vrf CUSTB
neighbor 172.16.4.1 remote-as 65501
neighbor 172.16.4.1 as-override
router ospf 1
network 2.2.2.2 0.0.0.0 area 0
network 10.1.2.1 0.0.0.0 area 0
mpls ldp router-id Loopback1
MPLS-VPN:PEルータのステータス確認コマンド
MPLS-VPNでは、PEルータでのルーティング確認が重要になってきます。今回はPE1ルータのステータス確認コマンドを紹介します。確認コマンドは、PE⇔CE間でどのIGPを使用している場合でも同じコマンドとなります。
◆ PE1# show ip route vrf CUSTA
⇒ MP-BGPにより「192.168.2.0/24」のBGPルートを受信していることを確認。
◆ PE1# show ip route vrf CUSTB
⇒ MP-BGPにより「192.168.4.0/24」のBGPルートを受信していることを確認。
◆ PE1# show ip cef vrf CUSTA 192.168.2.0
⇒ ラベルが2つ付いていることを確認。
◆ PE1# show ip cef vrf CUSTB 192.168.4.0
⇒ ラベルが2つ付いていることを確認。
◆ PE1# show ip bgp vpnv4 all
⇒ MP-BGPで通知された「Next Hop」は、MP-BGPピアのアドレスであることを確認。
◆ PE1# show ip bgp vpnv4 all 192.168.2.0
⇒ Extended Communityに「RT:10:100」が付加されていることを確認。
⇒ リモートのラベル(out)が付加されていることを確認。
◆ PE1# show ip route
⇒ 常にMPLS-VPN網内のルーティング情報だけがテーブルに存在することを確認。